
每个Android开发应该都知道Activity,用得也特别熟悉,但知道怎么用之后你知道它是怎么来的吗?今天我来介绍下整个Activity的启动流程,让你既知道怎么用又知道它怎么来。
首先从《Android进阶解密》里挑个大图来看看
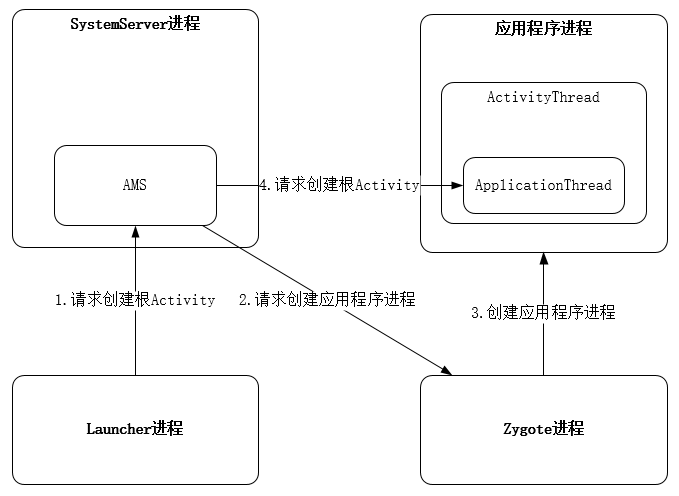
整个Activity的大图基本就在上面这个图里,本文尽量避免直接贴代码的方式(Activity那一大坨的启动代码能全部看下来我只能说佩服),从上图看Activity的启动核心就涉及4个关键角色
1、Launcher进程
2、SystemServer的AMS(ActivityManagerService)
3、应用程序本身ActivityThread
4、用于启动应用的Zygote进程
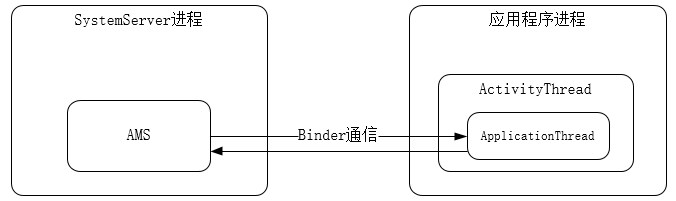
其中最最核心的就是AMS和ActivityThread之间的通信
从Launcher启动
所谓的从Launcher就是点击手机上的app图标启动Activity,Launcher本身也是一个Activity,它启动app的首个Activity
//Activity内部
public void startActivityForResult(@RequiresPermission Intent intent, int requestCode,
        @Nullable Bundle options) {
    //mMainThread是ActivityThread,mMainThread.getApplicationThread()是获取ApplicationThread
    Instrumentation.ActivityResult ar =
        mInstrumentation.execStartActivity(
            this, mMainThread.getApplicationThread(), mToken, this,
            intent, requestCode, options);
}
// Instrumentation内部
public ActivityResult execStartActivity(
        Context who, IBinder contextThread, IBinder token, Activity target,
        Intent intent, int requestCode, Bundle options) {
    //1. 将ApplicationThread转为IApplicationThread
    IApplicationThread whoThread = (IApplicationThread) contextThread;

    //2. 获取AMS实例,调用startActivity方法
    int result = ActivityManager.getService()
        .startActivity(whoThread, who.getBasePackageName(), intent,
                intent.resolveTypeIfNeeded(who.getContentResolver()),
                token, target != null ? target.mEmbeddedID : null,
                requestCode, 0, null, options);
    checkStartActivityResult(result, intent);

    return null;
}
上面的代码简答说就是通过AIDL的方式获取AMS,让AMS来继续发起启动Activity的流程,其中AMS内会先判断下Activity所在的进程启动没,没有的话通过Socket的方式告诉Zygote进程给fork一个对应进程出来。
Zygote启动了进程之后,其实就是直接进入到我们熟知的ActivityThread的main方法,然后启动个主线程Looper开始接受消息(了解Looper的应该对这部分逻辑一下子清晰了)
public static void main(String[] args) {

    Looper.prepareMainLooper();

    ......
    //分析
    ActivityThread thread = new ActivityThread();
    thread.attach(false, startSeq);

    Looper.loop();

    throw new RuntimeException("Main thread loop unexpectedly exited");
}
AMS与ActivityThread通信
上面代码的中间部分就是我们最上面大图的步骤4,AMS和ActivityThread直接通信
final ApplicationThread mAppThread = new ApplicationThread();
private void attach(boolean system, long startSeq) {
    ......
    if (!system) {
        //这一步是获取AMS实例,上面已经出现过
        final IActivityManager mgr = ActivityManager.getService();
        //然后跨进程通信
        mgr.attachApplication(mAppThread, startSeq);
    }
}
上图在ActivityThread继续通过aidl获取AMS,并执行它的attachApplication方法
public final void attachApplication(IApplicationThread thread, long startSeq) {
    synchronized (this) {
        int callingPid = Binder.getCallingPid();
        final int callingUid = Binder.getCallingUid();
        final long origId = Binder.clearCallingIdentity();
        attachApplicationLocked(thread, callingPid, callingUid, startSeq);
        Binder.restoreCallingIdentity(origId);
    }
}

@GuardedBy("this")
private final boolean attachApplicationLocked(IApplicationThread thread,
        int pid, int callingUid, long startSeq) {

    ......
    //这里的thread就是ActivityThread中的ApplicationThread
    thread.bindApplication(processName, appInfo, providers,
            app.instr.mClass,
            profilerInfo, app.instr.mArguments,
            app.instr.mWatcher,
            app.instr.mUiAutomationConnection, testMode,
            mBinderTransactionTrackingEnabled, enableTrackAllocation,
            isRestrictedBackupMode || !normalMode, app.persistent,
            new Configuration(getGlobalConfiguration()), app.compat,
            getCommonServicesLocked(app.isolated),
            mCoreSettingsObserver.getCoreSettingsLocked(),
            buildSerial, isAutofillCompatEnabled);

    // See if the top visible activity is waiting to run in this process...
    //看一下是不是有需要运行的Activity
    if (normalMode) {
        try {
            if (mStackSupervisor.attachApplicationLocked(app)) {
                didSomething = true;
            }
        } catch (Exception e) {
            Slog.wtf(TAG, "Exception thrown launching activities in " + app, e);
            badApp = true;
        }
    }

    ......
    return true;
}
上面的代码简单说分两步
1、我们发现AMS里又通过ActivityThread中的ApplicationThread跨进程调用ApplicationThread的bindApplication方法,看方法名字就是告诉应用程序创建你的Application
2、开启第一个Activity,调ActivityStackSupervisor的attachApplicationLocked方法。
先来看看第一步
创建Application
public final void bindApplication(String processName, ApplicationInfo appInfo,
        List<ProviderInfo> providers, ComponentName instrumentationName,
        ProfilerInfo profilerInfo, Bundle instrumentationArgs,
        IInstrumentationWatcher instrumentationWatcher,
        IUiAutomationConnection instrumentationUiConnection, int debugMode,
        boolean enableBinderTracking, boolean trackAllocation,
        boolean isRestrictedBackupMode, boolean persistent, Configuration config,
        CompatibilityInfo compatInfo, Map services, Bundle coreSettings,
        String buildSerial, boolean autofillCompatibilityEnabled) {

    AppBindData data = new AppBindData();
    .......
    //主要就是发送一个消息
    sendMessage(H.BIND_APPLICATION, data);
}

void sendMessage(int what, Object obj) {
    sendMessage(what, obj, 0, 0, false);
}

private void sendMessage(int what, Object obj, int arg1, int arg2, boolean async) {
    if (DEBUG_MESSAGES) Slog.v(
        TAG, "SCHEDULE " + what + " " + mH.codeToString(what)
        + ": " + arg1 + " / " + obj);
    Message msg = Message.obtain();
    msg.what = what;
    msg.obj = obj;
    msg.arg1 = arg1;
    msg.arg2 = arg2;
    if (async) {
        msg.setAsynchronous(true);
    }
    //mH是一个Handler,发送了一个消息
    mH.sendMessage(msg);
}


 class H extends Handler {
        //先看看这个Handler的部分消息名称,一看就知道是干嘛的,什么绑定Application,绑定Service,停止Service什么的.这个Handler和这些组件的启动停止什么的,关系非常大.
        //其实这个Handler在API 28之前的时候消息更多,(API 28只是融合了一下,多个消息变成1个消息,还是会走到这个Handler),之前Activity的各种生命周期回调都有对应的消息名称里.现在是融合了.
        public static final int BIND_APPLICATION        = 110;
        public static final int EXIT_APPLICATION        = 111;
        public static final int RECEIVER                = 113;
        public static final int CREATE_SERVICE          = 114;
        public static final int SERVICE_ARGS            = 115;
        public static final int STOP_SERVICE            = 116;
        public static final int CONFIGURATION_CHANGED   = 118;
        public static final int CLEAN_UP_CONTEXT        = 119;
        public static final int GC_WHEN_IDLE            = 120;
        public static final int BIND_SERVICE            = 121;
        public static final int RELAUNCH_ACTIVITY = 160;
}
拿到一个Handler,通过它来发送各种消息,比如创建应用,销毁应用等等
具体创建Application的方法会执行到以下代码
private void handleBindApplication(AppBindData data) {

    // Continue loading instrumentation.
    if (ii != null) {
        ApplicationInfo instrApp;
        instrApp = getPackageManager().getApplicationInfo(ii.packageName, 0,
                UserHandle.myUserId());
        //构建ContextImpl
        final ContextImpl instrContext = ContextImpl.createAppContext(this, pi);
        //获取其classLoader
        final ClassLoader cl = instrContext.getClassLoader();
        //构建Instrumentation
        mInstrumentation = (Instrumentation)
            cl.loadClass(data.instrumentationName.getClassName()).newInstance();
    } else {
        mInstrumentation = new Instrumentation();
        mInstrumentation.basicInit(this);
    }

    Application app;
    // If the app is being launched for full backup or restore, bring it up in
    // a restricted environment with the base application class.
    //构建Application
    app = data.info.makeApplication(data.restrictedBackupMode, null);

    //调用Application的onCreate方法
    mInstrumentation.callApplicationOnCreate(app);
}

//sources/android-28/android/app/LoadedApk.java#makeApplication
public Application makeApplication(boolean forceDefaultAppClass,
        Instrumentation instrumentation) {
    //注意,如果Application已经初始化,那么就不重新初始化了
    if (mApplication != null) {
        return mApplication;
    }

    Application app = null;

    String appClass = mApplicationInfo.className;
    if (forceDefaultAppClass || (appClass == null)) {
        appClass = "android.app.Application";
    }
    //构建Application
    app = mActivityThread.mInstrumentation.newApplication(
            cl, appClass, appContext);
    appContext.setOuterContext(app);

    return app;
}

//sources/android-28/android/app/Instrumentation.java#newApplication
public Application newApplication(ClassLoader cl, String className, Context context)
        throws InstantiationException, IllegalAccessException,
        ClassNotFoundException {
    //通过反射构建Application
    Application app = getFactory(context.getPackageName())
            .instantiateApplication(cl, className);
    //赋值Context
    app.attach(context);
    return app;
}
public @NonNull Application instantiateApplication(@NonNull ClassLoader cl,
        @NonNull String className)
        throws InstantiationException, IllegalAccessException, ClassNotFoundException {
    return (Application) cl.loadClass(className).newInstance();
}
通过ClassLoader加载构建Instrumentation对象,然后通过LoadedApk调用Instrumentation的newApplication 方法通过loadClass的方式将Application对象创建出来,然后调用Application的onCreate生命周期方法。(是不是一下子感觉跟平时写app对上号了)
启动Activity
前面说的ActivityStackSupervisor的attachApplicationLocked方法本质上也是Handler发送消息的方式来实现
boolean attachApplicationLocked(ProcessRecord app) throws RemoteException {
    ......
    realStartActivityLocked(activity, app,top == activity, true);
    ......
}

final boolean realStartActivityLocked(ActivityRecord r, ProcessRecord app,
            boolean andResume, boolean checkConfig) throws RemoteException {
    ......
    // Create activity launch transaction.
    //创建活动启动事务。
    final ClientTransaction clientTransaction = ClientTransaction.obtain(app.thread,
            r.appToken);
    //构建LaunchActivityItem对象,并传入clientTransaction中,用作callback
    clientTransaction.addCallback(LaunchActivityItem.obtain(new Intent(r.intent),
            System.identityHashCode(r), r.info,
            // TODO: Have this take the merged configuration instead of separate global
            // and override configs.
            mergedConfiguration.getGlobalConfiguration(),
            mergedConfiguration.getOverrideConfiguration(), r.compat,
            r.launchedFromPackage, task.voiceInteractor, app.repProcState, r.icicle,
            r.persistentState, results, newIntents, mService.isNextTransitionForward(),
            profilerInfo));

    // Schedule transaction.
    //执行事务  这里getLifecycleManager获取的是ClientLifecycleManager
    mService.getLifecycleManager().scheduleTransaction(clientTransaction);
    ......
}

//ClientLifecycleManager#scheduleTransaction
void scheduleTransaction(ClientTransaction transaction) throws RemoteException {
    //继续深入
    transaction.schedule();
}

//ClientTransaction#schedule
public void schedule() throws RemoteException {
    //这里的mClient是ApplicationThread
    mClient.scheduleTransaction(this);
}

//ApplicationThread#scheduleTransaction
@Override
public void scheduleTransaction(ClientTransaction transaction) throws RemoteException {
    //ActivityThread是继承自ClientTransactionHandler的,scheduleTransaction方法在ClientTransactionHandler里面
    ActivityThread.this.scheduleTransaction(transaction);
}

//ClientTransactionHandler#scheduleTransaction
void scheduleTransaction(ClientTransaction transaction) {
    transaction.preExecute(this);
    //注意啦,这里向ActivityThread里面的H这个Handler发送了一个EXECUTE_TRANSACTION的消息,并且将ClientTransaction对象也传了进去
    sendMessage(ActivityThread.H.EXECUTE_TRANSACTION, transaction);
}
上面的代码最直接看就是sendMessage,看看sendMessage后,handler如何处理的
//ActivityThread#handleLaunchActivity
@Override
public Activity handleLaunchActivity(ActivityClientRecord r,
        PendingTransactionActions pendingActions, Intent customIntent) {
    .....
    //终于要开始调用performLaunchActivity这个熟悉的方法了
    final Activity a = performLaunchActivity(r, customIntent);
    ......
}

//ActivityThread#performLaunchActivity
private Activity performLaunchActivity(ActivityClientRecord r, Intent customIntent) {
    ......
    ContextImpl appContext = createBaseContextForActivity(r);
    Activity activity = null;

    //获取ClassLoader
    java.lang.ClassLoader cl = appContext.getClassLoader();

    //通过(Activity) cl.loadClass(className).newInstance()创建
    //重点来啦:Activity是在ActivityThread的performLaunchActivity方法中用ClassLoader类加载器创建出来的。
    activity = mInstrumentation.newActivity(cl, component.getClassName(), r.intent);

    //底层也是通过反射构建Application,如果已经构建则不会重复构建,毕竟一个进程只能有一个Application
    Application app = r.packageInfo.makeApplication(false, mInstrumentation);

    if (activity != null) {
        Window window = null;
        appContext.setOuterContext(activity);
        //在这里实例化了PhoneWindow,并将该Activity设置为PhoneWindow的Callback回调,还初始化了WindowManager
        activity.attach(appContext, this, getInstrumentation(), r.token,
                r.ident, app, r.intent, r.activityInfo, title, r.parent,
                r.embeddedID, r.lastNonConfigurationInstances, config,
                r.referrer, r.voiceInteractor, window, r.configCallback);

        //间接调用了Activity的performCreate方法,间接调用了Activity的onCreate方法.
        mInstrumentation.callActivityOnCreate(activity, r.state);

        //这里和上面onCreate过程差不多,调用Activity的onStart方法
        if (!r.activity.mFinished) {
            activity.performStart();
            r.stopped = false;
        }
        ....
    }

    return activity;
}
上面的流程应该开发Android的看着都觉得亲切了,performLaunchActivity中直接通过classLoader去拿对应的Activity,紧接着onCreate,onStart之类的触发也就顺气自然了。
整体上Activity的启动就是上面介绍的流程,这篇文章的成型主要是借鉴了以下两篇文章的内容,附链接如下
也是不能再专业了!果然是大神!
膜拜!收了!